


在本 spring boot 教程中,我们将学习如何调用第三方 api 并将响应数据显示在浏览器视图中。我们将使用 https://api.sampleapis.com/coffee/hot 这个 api 获取咖啡列表。
准备工作:
你需要具备以下基础知识:
- Java
- Spring Boot
- Thymeleaf (模板引擎)
开发步骤:
1. 创建 Spring Boot 项目
使用 Spring Initializr (https://www.php.cn/link/4ac20f72e05b86b3dc759608b60f5d67) 创建一个新的 Spring Boot 项目,并添加以下依赖项:
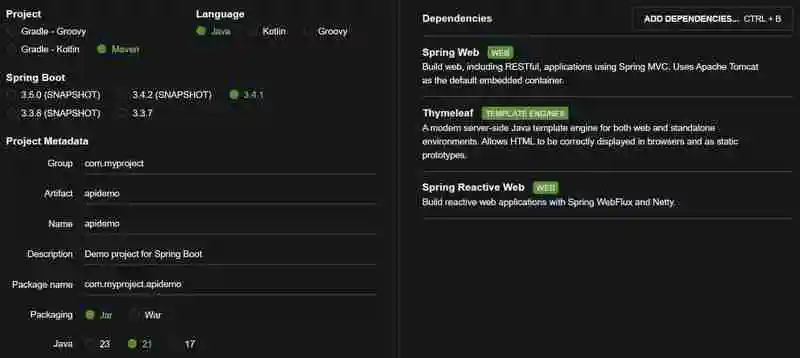
下载项目并使用 IDE (例如 IntelliJ IDEA) 打开。
2. 创建 Coffee 类
创建一个名为 Coffee 的 Java 类,用于映射 API 响应数据:
package com.yourpackage; // 替换成你的包名

public class Coffee {

    private String title;
    private String description;

    // 构造器、getter 和 setter 方法
    public Coffee() {}

    public Coffee(String title, String description) {
        this.title = title;
        this.description = description;
    }

    // ... getter and setter methods ...
    public String getTitle() { return title; }
    public void setTitle(String title) { this.title = title; }
    public String getDescription() { return description; }
    public void setDescription(String description) { this.description = description; }

    @Override
    public String toString() {
        return "Coffee{" +
                "title='" + title + ''' +
                ", description='" + description + ''' +
                '}';
    }
}
3. 创建控制器 (CoffeeController)
创建一个控制器类 CoffeeController 来处理 API 调用和数据传递到视图:
package com.yourpackage; // 替换成你的包名

import org.springframework.stereotype.Controller;
import org.springframework.ui.Model;
import org.springframework.web.bind.annotation.GetMapping;
import org.springframework.web.reactive.function.client.WebClient;
import java.util.List;

@Controller
public class CoffeeController {

    private final WebClient webClient = WebClient.create();

    @GetMapping("/coffee")
    public String getCoffeeList(Model model) {
        String url = "https://api.sampleapis.com/coffee/hot";

        List<Coffee> coffeeList = webClient.get()
                .uri(url)
                .retrieve()
                .bodyToMono(List.class) // 使用List.class代替ParameterizedTypeReference
                .block();

        model.addAttribute("coffeeList", coffeeList);
        return "coffee";
    }
}
4. 创建 Thymeleaf 视图 (coffee.html)
创建一个名为 coffee.html 的 Thymeleaf 模板文件 (位于 src/main/resources/templates 目录下) 来显示咖啡列表:
<!DOCTYPE html>
<html xmlns:th="http://www.thymeleaf.org">
<head>
    <meta charset="UTF-8">
    <title>Coffee List</title>
</head>
<body>
    <h3>Coffee List</h3>
    <table>
        <thead>
            <tr>
                <th>Title</th>
                <th>Description</th>
            </tr>
        </thead>
        <tbody>
            <tr th:each="coffee : ${coffeeList}">
                <td th:text="${coffee.title}"></td>
                <td th:text="${coffee.description}"></td>
            </tr>
        </tbody>
    </table>
</body>
</html>
5. 运行项目
运行你的 Spring Boot 应用程序。 访问 http://localhost:8080/coffee (或你的应用程序的基 URL) 即可在浏览器中查看咖啡列表。
注意: 确保你的 pom.xml 文件正确配置,并且 Maven 能够正确解析依赖项。如果遇到导入错误,尝试重新加载 Maven 项目。 bodyToMono(List.class) 直接使用 List.class 代替之前的 ParameterizedTypeReference 方法,简化了代码。 记得将 com.yourpackage 替换成你项目的实际包名。